
|

Troubleshooting Your Existing System
Sprinkler Heads
Gear Drives
Blue Sky Irrigation has used Hunter gear drive heads on every system we have installed. They usually
will remain adjusted for the life of the head, but occasionally will require adjustment. It is far
better to adjust heads while they are running, as you can see where the rotations stop. It is
important to remember that the right stop on these is factory fixed, and can not be changed with the
Hunter key. The right stop is with you positioned behind the head, with the spray going away from you.
To adjust the right stop, turn the top turret all the way to the right, then grasp the body of the
head, and rotate it in the ground to the point you want it to stop. (There should be some resistance to
 this, as you are turning the entire sprinkler body buried in the ground) Always let the sprinkler run
a few cycles on it's own to make sure it is set properly. The top turret, or section that rotates, can
be freely rotated back and forth with no damage to the head. Rather than wait for an entire cycle,
simply rotate turret near the stop, and wait for it to complete cycle while checking adjustment. Now
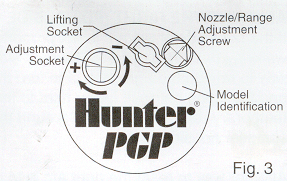
you can use the Hunter key (A small to medium blade flat screwdriver will also work) to adjust the
left stop. Insert key into the slot marked + -, and turn in the direction you want to increase
rotation, + for more, - for less. These heads can be adjusted from 40 degree's to a full 360 degree
rotation. They will not go below 40 degree's.
The distance, or throw, can also be altered by adjusting the nozzle retaining screw. The allen head
on a Hunter key is for this purpose. Insert allen into the arrow above the nozzle, and catch the
allen screw inside. Turn into the spray to decrease the throw. Be very careful backing screw out.
Once you reach a certain point, the distance can not be increased any more. If the screw is backed
out to far, the nozzle will have no retention, and the water will pop it out of the head.
Sprayheads
Sprayheads have no moving parts, but do have a screw on nozzle, and a filter screen under the nozzle.
Dirty screens can affect sprayhead performance, and can easily be cleaned. Find the head in question, and
gently pry nozzle up to a point you can grasp the shaft with your hand. Pull up to full height, and unscrew
nozzle. This should reveal the screen underneath. Remove screen, and temporarily reinstall the nozzle.
(If you let shaft snap back in without the nozzle, you can screw nozzle onto it, and pull it back up)
Bring screen to hose bib or faucet, and simply wash debris off. Reinstallation is a reverse of this
process. Snug nozzles onto sprayhead hand tight. You do not need pliers. Sprayhead should be re-adjusted
after any nozzle removal to be sure it is set properly.
Adjustment
Blue Sky Irrigation has used RainBird sprayheads since @ 1988, so chances are good that if we
installed your system, this is what you will have. All RainBird sprayheads have a ratchet shaft. In
other words, when it is up and running, you can rotate it left or right by grasping the shaft, and
twisting it firmly. You will hear a clicking sound, similar to a mechanic's ratchet. For some reason,
sprayheads seem to rotate easier in one direction, but will rotate either way if enough torque is
applied. All adjustments to sprayheads must be made with the sprinklers running. There are two types
of spray nozzles, fixed, and adjustable. Fixed nozzles are a specific spray that can not be changed.
These nozzles will have scribes on the top of the nozzle indicating the spray pattern. If the scribes
show a ¼ or a ½ circle, then this is the spray it will emit. Full circles have no scribes at all.
The number on the nozzle, 8, 10, 12, etc., is the distance it will throw. To adjust these type of
nozzles, simply rotate shaft until spray is at desired location.
Adjustable nozzles also have a number representing the throw, but have no scribes to indicate the
pattern. They will have either a 0 or an L representing the left stop of the adjustment. To adjust
these, set the left side of the spray to desired location, since this if fixed. Then adjust collar at
bottom of nozzle (Just above where it attaches to sprinkler shaft) to the right to get desired spray.
These nozzles will go from off, to a full 360 degrees by turning the collar.
The throw, or distance, on a sprayhead can be shortened by up to about 25% by turning the nozzle
screw down. This is located in the center of the nozzle, and will require a small blade flat
screwdriver. Simply turn the screw in until desired throw is achieved. Choking a sprayhead to much
will cause inconsistent watering, and uneven spray. This condition will be apparent by simple
observation.
In some cases, the throw may be able to be increased slightly. In order for this to happen, the
nozzle screw would have been adjusted down upon initial installation. As a general rule, we would
simply have installed a smaller nozzle if the throw was to much, so this situation would be rare.
In cases where more throw is desired, the nozzle would need to be changed. Be aware that if you
change your own nozzles, you are altering the water flow (GPM). Bigger nozzles use more water, so
you can't change four # 12's to # 15's in one zone, and expect the pressure to remain the same. As
the volume goes up, the pressure goes down. Low pressure would give the appearance of clogged screens,
but across an entire zone.
|

